This post is intended to touch on a common privilege escalation vector within Active Directory environments. Before the release of BloodHound, the process we’ll be talking about today was performed manually by penetration testers that were looking to exploit trust-based relationships within an Active Directory domain. Since the release of this tool, the process of identifying useful relationships for privilege escalation purposes has been largely automated.

From a defensive standpoint, the tool we’re examining in this post can be utilized by an entity wanting to understand exactly how trust relationships are configured so that changes can be made to support only the trust relationships that are intended. From an attacker’s standpoint, credentials can be gathered in Active Directory environments supporting Windows 7 systems in their default configuration. Once a credential is gathered and compromised, it’s possible to login to systems in a legitimate way that grants access to the system if the compromised user has local Administrative privileges over the computer. If additional users are logged into the system that was originally compromised and the additional users have local administrative access over other systems, then the process of retrieving credentials stored insecurely within memory and logging into other systems can be repeated until a significant amount of access is obtained. BloodHound is a tool that will identify the relationships of users, to computers, to the level of access a user has, so it’s clear how an attacker would be able to move between systems and escalate privileges by abusing existing trust relationships.

With that background, let’s get started by discussing the BloodHound tool. We’ll cover how to get our environment configured, how to perform data collection, how to import the collected data, how to analyze the data, and how to identify action items that will lead to a better security posture.

Getting the Environment Configured

While it is possible to run BloodHound on Windows, we’ll instead keep the application compartmentalized within a Kali Linux virtual machine. Let’s go ahead and download VirtualBox or your preferred hypervisor and a Kali Linux image from the links below:

After getting the virtual machine up and running, run the following commands:

  • apt-get install bloodhound
  • neo4j console start
  • bloodhound

Collecting the Data

After getting the environment installed, the next step involves collecting data from the target environment. Collecting data can be done with a regular Domain User account, but information may be unable to be collected from more modern operating systems. To avoid this, I recommend using a privileged account to get the most accurate picture of available attack surface. However, it is useful to run the tool from different user contexts and network locations to validate the available attack surface in multiple breach scenarios.

There are two main ways to collect data with BloodHound, which will use underlying PowerShell functionality to gather the following items from Active Directory:

  • All computer objects
  • All user objects and the group membership of each user object
  • Group policy information
  • Domain trusts

BloodHound will then go out to each computer object enumerated from Active Directory and query the following information about the local system:

  • What user objects have a session established to the computer object
  • Local group membership
  • Local access control lists

The two different ingestors to collect all of this data are either a PowerShell script or an executable and ran with the command below (executable example shown) to produce a zip archive:

  • SharpHound.exe -CollectionMethod All

Importing the Data

Back at our BloodHound console in the Kali virtual machine, we can upload data by clicking the appropriately named Upload Data button. Before uploading any data, ensure that the database does not have any current entries. If there are current entries, select the Clear Database option and confirm that the data should be removed. Once the database is clear, perform the Upload Data action on the zip archive generated in the previous step.

Analyzing the Data -- Too Many Domain Admins

Once the data is uploaded, numbers should be populated in the database. To show the queries that are already configured to run against the analyzed data, select the Queries option within the BloodHound console.

To start, let’s select Find all Domain Admins as our first query. To maintain best practices and a good security posture, the results of this query should look something like the screen capture below, where the individual (green icon) users are Active Directory user accounts that have Domain Admin privileges (represented by the yellow icon).

A potentially less desirable result of this query would have security groups nested within the Domain Admins group and contain many more than the 8 Domain Admins above. While the first query may not have many action items due to the limited Domain Admins group membership, anything that resembles more complex trust relationships within the Domain Admins group indicates that an entitlement review of the Domain Admins group should be performed to ensure only employees of the company who need to administer the Active Directory domain are a member of this group with their privileged account. All other accounts that do not service or maintain the functionality of the domain should be removed from this group.

Analyzing the Data – Identifying Privilege Escalation Opportunities

While the first query may not have many action items in the first example due to the limited Domain Admins group membership, let’s click on the pre-built query identified as Find Shortest Path to Domain Admins. This query will take all the information provided and display possible paths that a threat actor could exercise to gain a high level of privilege within an environment.

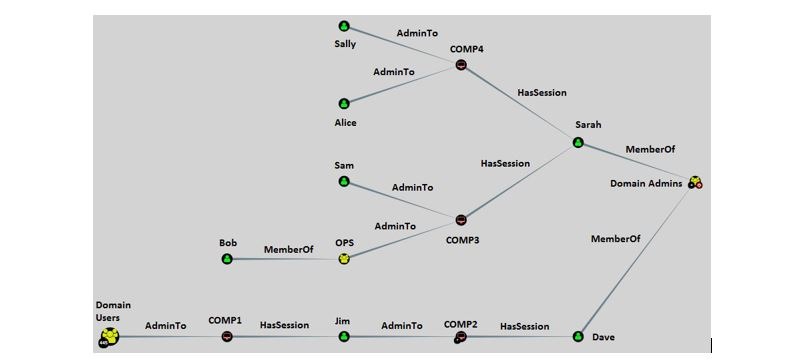
Above we see the same objects where the group of yellow objects are Active Directory security groups, the red monitors are Active Directory computer objects, and the green objects are Active Directory user accounts. However, in this instance, they are laid out in a fashion which has three key pieces of information:

  • AdminTo – Indicates that a user or a group of users has local administrative access to a specific computer object. As an example, the group called Domain Users, which has 445 users (indicated by the number in the corner of the object), is a local administrator over the COMP1 computer object.
  • HasSession – Indicates that a user has an active session to a specific computer that they have logged on to at some point in the past. Jim has a session to the COMP1 computer.
  • MemberOf – Just like in Active Directory lingo, this indicates that a user belongs to an Active Directory Security group. Dave is a MemberOf the Domain Admins security group.

Now that we know what the objects and the lines between objects mean, we can begin deriving actions that we can take to eliminate trust relationships between objects that result in an unintended path for privilege escalation. Let’s start with the example at the bottom of the picture where the Domain Users group with 445 users is a local administrator over the computer of COMP1. Our user Jim has a session to both COMP1 and is a local Administrator COMP2. The issue arises, when our user Dave used his Domain Admin user account to logon to COMP2, which is not a domain controller. It is critical that privileged credentials are treated like an attack surface, which means that the more places a credential is used the higher the likelihood for the credential to be compromised. By instructing users to use a privileged account only where necessary, the overall exposure of the credentials can be limited. Additionally, architecting Active Directory permission structures to avoid the usage of the Domain Admin groups for purposes other than administering a domain should also be in place (role based access security groups should be established for this purpose and should also deny logon rights to Domain Admins). From this scenario, we can derive the following actions items to improve our security posture:

  1. Remove the Domain Users group from the local Administrators group on computer COMP1. Allowing this group access in the context of the scenario above means that any of the 445 Domain Users can escalate to the Domain Admins security group.
  2. Perform an entitlement review to ensure that our user Jim needs administrative access to COMP2.
  3. Enforce technical Group Policy changes so that Domain Admin credentials are denied logon to any system that is not a Domain Controller.
  4. Initiate an education campaign to remind users that their Domain Admin accounts should not be used on computers that are not a Domain Controller.

For the second example that we’ll look at, let’s assume that the user Bob clicked on a phishing link and a threat actor now has remote access to his computer. If the threat actor is aware of the trust relationships between computer objects within our demo domain, the threat actor could compromise COMP3 with the access already obtained because Bob is a member of the OPS security group, which is a part of the local Administrators group on COMP3Sarah made the same mistake that our user Dave did in the previous example, and logged onto COMP3 with her Domain Admin account, which is not a Domain Controller. In this instance, our threat actor can obtain Domain Admin permissions over our domain by only pivoting to one additional host, COMP3. From this scenario, we will have a similar set of action items:

  1. Initiate an education campaign and additional security controls to help inform users of phishing attacks and to help users identify phishing attempts.
  2. Perform an entitlement review of the OPS Active Directory security group to ensure that only the users that should be a member are a member.
  3. Perform an entitlement review of the permissions on the COMP3 computer object to ensure that the OPS group needs to have local administrative access.
  4. Initiate an education campaign to remind users that their Domain Admin accounts should not be used on computers that are not a Domain Controller.

While the environment that we are looking at in this example is fairly simple, organizations that are much larger have many more systems and privileged groups. We should expect to see many more relationships between systems, users, groups, and domain trusts, which may lead to a full domain compromise.

Using Non-Standard Queries

Keep in mind that we only looked at two of the prebuilt queries. The remaining queries can be used to improve one’s security posture by analyzing the results and taking similar steps to the ones described above. All the steps will usually involve removing rights to eliminate attack paths. Also keep in mind that the Domain Admins group is not the only group that can grant administrative privileges to critical assets or data within an environment. Other privileged groups are of course Enterprise Admins, Schema Admins, and, less obvious groups where a company could use an Active Directory security group called SQLCLUSTER where multiple service accounts are a member of the one group to manage business critical databases. To identify attack paths of this nature, you can right click directly on an object and choose Shortest Paths to Here.

In this example, we’re looking to see if any users that are a member of the Domain Users group can gain access to the SQLCLUSTER group via unintended trust relationships. The results of the query tell us that this attack path is possible. In the picture below the yellow object with a blue icon is our starting point and the yellow object with a red cross hair is our destination. While the trust relationship isn’t a direct one, the results of the query below reveal that a regular user can escalate privileges to the targeted group by accessing the computer objects between the Domain Users group and the SQLCLUSTER group. From a threat actor’s standpoint, the threat actor would effectively have access to the SQLCLUSTER group if a user with the common Domain Users group membership were to be compromised by a phishing attempt, drive-by download, or other means of system compromise.

Closing Thoughts

Don’t forget that the changes you make can be validated by rerunning the data collection process, erasing the contents of the database, reimporting the data, and performing the same analysis that should now no longer show the trust relationships that were previously remediated. Performing this process many times over will successfully eliminate and monitor for undesirable trust relationships between the objects discussed within Active Directory as the domain has daily operational changes made to it.

A huge thanks to the developers of the BloodHound tool @_wald0, @CptJesus, and @harmj0y.