Microsoft Dynamics GP supports your people.  Whether it’s the back office order processor, the field service agent, the factory shop floor worker, or even the CEO, hidden pockets of productivity can be unlocked via instinctive and recognizable designs that provide a great user experience through the business solution.

Whether you are outgrowing entry-level accounting software, rubber-banding an outdated legacy solution, or simply tired of paying annual maintenance fees to a vendor that provides little to no value for your money—now is the time to give your people the tools they need to succeed. Microsoft Dynamics GP is an innovative, flexible solution that is fast to configure and deploy, easy to use, and provides forward-looking insights to help drive your business growth.

Reversing a Closed Year in Microsoft Dynamics GP

Year-End has been completed and all your hard work is over… and then your auditors come back with adjusting entries to an already closed year. This process will reverse the closing entries, including the account beginning balances that had already rolled over with the year-end close.

With versions of Microsoft Dynamics GP (2013 R2 and above), you have the ability to open previously closed years in Microsoft Dynamics GP. It is a fairly easy process and can be done by following the steps below.

  1. Get all users out of GP
  2. Make a backup of the company database
  3. Print a trial balance reports for verification (if needed)
  4. Reverse the historical year(s) – (Financial > Routines > Year-End Closing)
  5. After you have reversed the year, make sure and reconcile any open years starting with the oldest open year – (Financial > Utilities > Reconcile). *Note: Running this utility does not produce a report. This step is very important to your inquiry windows being correct.
    Reversing a Closed Year in Microsoft Dynamics GP
    If you have any additional questions feel free to contact us.

Dynamics GP & Customer Credit Limits

Microsoft Dynamics GP can help manage your customer credit limits and provide prompts, warnings and visual cues to help mitigate overextended customers.  This is an optional feature (setup details included below).

​Using the customer maintenance window (Cards/Sales/Customer), open the customer and choose the ‘options’ button.  This will open the Customer Maintenance Options window.

Note that the customer credit limit can be set to no credit, unlimited, or specific amount.

Dynamics GP & Customer Credit Limits

Dynamics GP & Customer Credit Limits

If ‘No credit’ is selected, users will be prompted every time a transaction is created for this customer.  If ‘Unlimited’ is selected, users will NOT be prompted at all.  Those are pretty self-explanatory but let’s explore ‘amount’ a little more.  If ‘Amount’ is selected, a dollar amount must be keyed into the amount field.  ​What this does is evaluate the transaction against open transactions for the customer.  If the new transaction puts (or adds to) the TOTAL open balance for the customer over the credit limit, the user will be warned.  Nice!

Dynamics GP & Customer Credit Limits

Let’s take it one step further and say our customer has a credit limit of 35,000.  Maybe we also want to be warned if they have not been as current as they should be.  We can set this up and extend the credit limit by saying something like ‘Warn me if the customer has more than 5,000 in the 90-day aging bucket’.  To do something like this, click on the blue arrow to the right of the credit limit amount to open the ‘Display Credit Limit Warning’ window.  What this does is evaluate the transaction against open transactions for the customer.  If the new transaction puts (or adds to) the TOTAL open balance for the customer over the credit limit, the user will be warned.  Nice!

Dynamics GP & Customer Credit Limits

As I mentioned, these warnings and cues are optional.  Visit Tools/Setup/Sales/Receivables and mark the options as needed for your business process.
​This change is system-wide and can be made at any time.  Below are some sample screenshots of the types of warnings users would receive if you leverage this great feature.
Dynamics GP & Customer Credit Limits

How to fix script error in Dynamics GP Payables Document Lookup Window

On a recent screen share with a client, we discovered script errors when the client was trying to open the payables document inquiry window. The message the client was receiving was below:

Unhandled script exception:
Index 0 of array ‘PM Transaction Abbreviation’ is out of range in
script ‘PM_Transaction_Inquiry_Scroll_FILL’. Script Terminated.

The message appeared twice before disappearing and the records appeared in the window. When they did, I noticed two blank historical records showing up in the first two lines. There were two broken records in the PM00400 table of GP.

Before you start, make sure you take a backup of your company database in question.

  1. Run check links on the payables transaction logical files
  2. Check to see if this has resolved your issue
  3. If not, sort the PM00400 by CNTRLNUM  and check if any blank records exist in PM00400.
    Select * from PM00400  Order by CNTRLNUM= ‘ ‘  
  4. If blank records exist- delete them.
    Delete from PM00400 where CNTRLNUM= ‘ ‘  
  5. Close the inquiry window that was in question. Open the window and you should be good to go!
If you have any questions feel free to contact us and we’ll be happy to assist!

Trouble Reconciling Your Bank Account in GP?

Have you ever received this message while trying to reconcile your checkbook in Microsoft Dynamics GP – “The difference must be zero before you can reconcile this checkbook”?…  And the difference appears to be zero, all your amounts balance but you still cannot click on the reconcile button?

​The reason for this occurring is that the checkbooks are looking for two decimal places behind each back transaction.

All total must have two decimal places and only two decimal places are shown on the reconciliation screen.  However, in the bank reconciliation and checkbook tables there is a spot to allow for additional decimal places. If you are using integration manager or SmartConnect to import into these fields and you do not change the decimals to two places prior to the import, this can cause additional decimal places for those transactions in the tables. This will lead to the error above.

How to fix the Decimal Places in the Bank Transactions

There is no way to fix this in the end-user workstation.  The fix must be done in SQL Management Studio.  If you are not familiar with SQL, please contact your IT personnel or your GP Partner.

Always make a backup of the company database prior to running any scripts.

First look for any records that have more than one decimal place in the company database.

Select TRXAMNT,* from CM20200 where substring(str(TRXAMNT,10,5), patindex(‘%.%’,str(TRXAMNT,10,5))+3, 1) > 0
Select TRXAMNT,* from CM20200 where substring(str(TRXAMNT,10,5), patindex(‘%.%’,str(TRXAMNT,10,5))+4, 1) > 0
Select TRXAMNT,* from CM20200 where substring(str(TRXAMNT,10,5), patindex(‘%.%’,str(TRXAMNT,10,5))+5, 1) > 0

If the scripts return any results, run these scripts against the company database.

UPDATE CM20200 SET TRXAMNT=(FLOOR((TRXAMNT * 100)))*.01 WHERE TRXAMNT <> 0 and TRXAMNT > 0
UPDATE CM20200 SET TRXAMNT=(CEILING((TRXAMNT * 100)))*.01 WHERE TRXAMNT <> 0 and TRXAMNT < 0

After you run the scripts above, validate that the checkbook balance is also two decimal places.

Select DEX_ROW_ID, CURRBLNC, * from CM00100 where CHEKBKID = ‘YYYY’
Note In this statement, YYYY represents the checkbook ID that you are reconciling.

If the checkbook has more than two decimal places, please run this script.  The CURRBLNC field is the current balance and should stay the same with just two decimal places instead of what was showing in the script.  Dex Row ID below will be replaced with the Dex row ID above.

UPDATE CM00100 SET CURRBLNC = ZZZ.ZZZZZ
WHERE DEX_ROW_ID = ##
Note In this statement, ZZZ.ZZZZZ represents the actual balance amount with only two decimal places, and ## represents the actual DEX_ROW_ID value. 

And you’re done!  If you have any questions feel free to contact us.


Are Your Dynamics GP 1099 Amounts Incorrect in the 1099 Details Window?

I recently assisted a client who was experiencing 1099 pains after completing an upgrade to Microsoft Dynamics GP 2015 this past year. When reviewing the edit 1099 transaction window and historical AP transactions, the 1099 amounts were all correct. However, upon viewing the 1099 details window along with the edit 1099 amounts report, the amounts were all off. It appears that every 1099 amount prior to upgrading was lost in table PM00204 during the client upgrade.
We tried the usual suspects to fix the error, like checking links and reconciling utilities, but nothing was correcting the amounts. All the amounts in PM00204 prior to the upgrade were still incorrect.

​I finally began a case with Microsoft to determine if this was a system reported error. We ran several scripts on the historical PM tables along with PM00204.

Finally, one engineer suggested that we begin with the first corrupt year and then work towards the current year. We reconciled each year, ran the 1099 edit list and all the amounts were fixed.

​Microsoft has not yet given a reason as to why this occurred, as it is the first reported case, but I wanted to share in case any of you out there experience the same issue in the future.

How to Find Your Microsoft Dynamics GP Version Number

In order to find your Microsoft Dynamics GP version number, click on the help button in the top right corner of your GP Home Page (small blue circle with a question mark) and then click on “About Microsoft Dynamics GP”.  The about screen will look like the screen below.  On the right side under “Version Information”, you will find your Microsoft Dynamics GP build on the first row (in the example below, the build is 14.00.0804 (R2)).

How to Find Your Microsoft Dynamics GP Version Number

See the chart below for your build and the corresponding version:
Build Number
GP Version
From
To
11.0.1247
11.00.1751
2010
11.00.1752
11.99.9999
2010 R2
12.00.1295
12.00.1744
2013
12.00.1745
12.99.9999
2013 R2
14.00.0524
14.00.0724
2015
14.00.0725
14.99.9999
2015 R2
16.00.0404
TBD
2016
If you have any questions please feel free to contact us.

Refreshable Excel Reports - Live Dynamics GP Data at Your Fingertips

If you are like most accounting staff, you spend a lot of your time running reports, exporting, and emailing data out of Great Plains to your non-GP users. Many users also spend time exporting SmartList data as well. Microsoft has come up with an amazing solution, which requires no additional user licensing in Great Plains: Excel Reporting.
Excel Reporting brings your data from the SQL database straight into excel. Each time a new record is added, the data in your excel refreshable report will update upon refresh. Add a new customer record? The data would appear in a refreshable customer list. Excellent for all your salesperson and customer service users. Need a detailed list of all GL account transactions? Post a new journal entry and watch as it’s added to your refreshable report.
The reports come standard with filters, the ability to hide unwanted columns, and user security built into the SQL server, freeing up any additional use of GP licensing. Several of the stock reports also come with a hyperlink, allowing GP users to drill back into GP from the excel report.

The great news about these reports are there are a lot of stock, out-of-the-box reports, which come standard with Microsoft Dynamics GP. It is simply a matter of launching your reports and testing and trying them. Once you find the ones you like, save them to a desktop or network shared location and have up-to-date information at your fingertips.

Due to the fact that these reports can be used across a company domain, the security to the reports are granted in SQL Server Management Studio. Below are the steps to grant access to your users. User security will follow the same role logic as Microsoft Dynamics GP basic roles, which is shown below. The following steps should be followed once Microsoft Dynamics Excel Reports are deployed.

Step 1: Log in to Microsoft SQL Server Management Studio as a system administrator. (Helpful Hint: If you don’t have access to this program, the server, or have any clue what I am talking about, recruit your GP administrator to assist you.)

Step 2:  Expand the Security Section.
Step 3:  Expand the Security Section. When everything is expanded, your section should look like Figure 1.

Figure 1
Microsoft Dynamics GP Excel Reporting Security

Step 4:  Check to see if the user and/or user group already exists. Your domain user or user names will appear as they would with a windows login. For example, ARTISINC/SMULLINS. (Helpful Hint: The security must be granted to the domain user, not the GP SQL user.)

Step 5:  Add the missing user or user group, if necessary. Right-click on the word “Logins”. Click on “New Login”.

Step 6:  Find the user or user group in the domain directory. If you are not sure what their user/group name is, you can use the search function by clicking on search. You can search by the first few letters or the user or group name.

Step 7:  Once you select your user or group, click on the user mapping node:

Microsoft Dynamics GP Excel Reporting Security

Step 8:  Add the user to the DYNAMICS database as a “rpt power user”.

Step 9:  Find the first company database to grant access. Make sure the role membership “DYNGRP” is checked.

Step 10:  Decide what report security the user will need. The role logic follows that of GP. A user can hold multiple “rpt” roles. A user call also be a rpt power user, which will grant them access to all modules.
Step 11:  Click “Ok”.
Step 12:  Verify the user can access the reports.
Step 13:  Success!If you have any questions feel free to contact us.

Turn Off Those Wasteful Reports

As an accountant myself, I completely understand the desire to have a paper audit trail. After all, you will be the hero at audit time when you get asked for the posting journal for that one entry.  Much like green bar paper, printed versions of most reports just simply aren’t needed anymore.  Isn’t technology great?  Imagine the benefits of not printing those bulky reports – the impact you would have on the environment, the money you could save on paper and toner, and space!  No more bundling, stapling, whole punching, labeling, filing… sounds incredible right?

With the power of Microsoft Dynamics GP, which has a very intuitive audit trail system for transactions on the GL, you can stop printing those bulky documents and only print the ones you truly need, when you need them!

Whether you are posting Journal Entries, Cash Receipts, Payables Transactions, etc., most journals can be printed on demand in Dynamics GP, eliminating the need to print the journals as the posting happens.

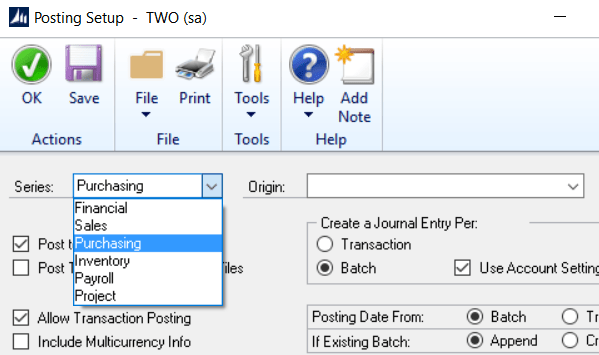
Are you always hitting cancel 2 or 5 times after you post a batch?  Are you interested in saving paper and time?  Use the Posting Setup window to turn on/off reports that run during posting routines.  To access this window, navigate to Microsoft Dynamics GP/Tools/Setup/Posting/Posting.  This window has many different offerings for companywide setup, by module and task type.  At the top of the window, you can select the ‘Series’ (or module) then select the ‘Origin’ (or task type) from the top right.

GP Life Hack #109

GP Life Hack #109

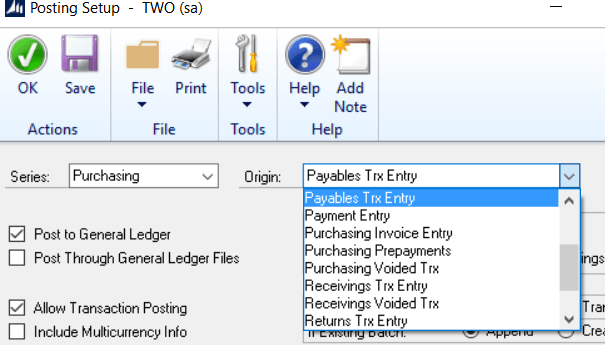
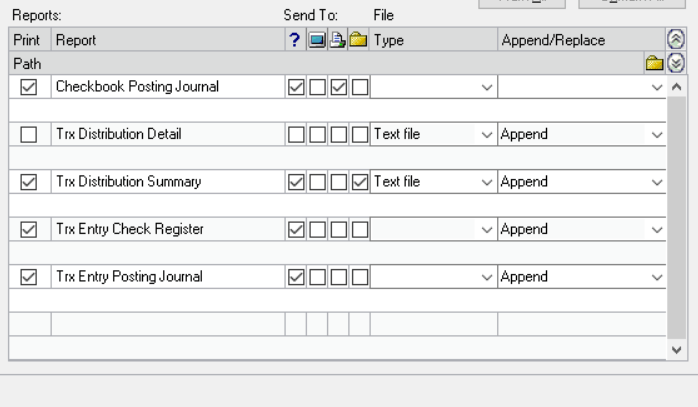
Once you select a Series and an Origin, take a look at the bottom scrolling list.  These are the reports available for this specific Series and Origin.  In my example here, Purchasing/Payables Transaction Entry, I have 5 reports available.  I can choose to uncheck the checkbox to turn that report off, or even make some changes in the “Send To” area to prompt me each time, bring it to the screen each time, print each time, or even save it off as a file, rather than print.

These settings apply to the specific company you are logged into and apply to all users who use that particular company.

GP Life Hack #109

Try adjusting these settings in a TEST company and start saving time and money!

If you have any questions, feel free to contact us.

Updating your GP Registration Keys

If you need to update your registration keys in Microsoft Dynamics GP to add more users, etc., follow the steps below to complete the process.

1. It is not required, but strongly recommended that you have all users exit the system and take a backup of the databases.

2. Once that is complete, log into GP as the ‘sa’ user and go to Administration > Registration.
Updating your GP Registration Keys
3. Clear out the existing keys that are in the window and enter the new ones.  The site name will most likely stay the same.  You may not need to enter data in all 5 fields.  Then click “Validate”.
Updating your GP Registration Keys
4. The bottom portion of the window should populate with all of your modules and at this point, you can click “OK” and see your updated user count, etc.
Updating your GP Registration Keys
And you’re done! If you have any questions feel free to contact us for assistance.