
Although Microsoft, I’m sure, would prefer that you use their Flow product, there are other cross-application workflow engines out there like Zapier. Zapier, specifically, does have a “Dynamics CRM” adapter, but it currently only supports version 8.0 (e.g. prior to the “July 2017” release). Fortunately, Zapier generically supports HTTP GET and POST operations and, since Dynamics 365 has a REST-based web API, we’re in business.
The most complicated part is setting up the authentication for what’s called a “Service-to-Service” (or “S2S”) request. For Dynamics 365, this requires adding an App in Azure Active Directory. If you have a Dynamics 365 online tenant, you have an Azure Active Directory, whether you know it or not.
Create the Azure AD App
I largely followed the Dynamics 365 documentation, beginning with the, “Grant your application rights to access Dynamics 365 (online) data,” on this page: https://msdn.microsoft.com/en-us/library/mt790170.aspx.
1. Go to the Azure portal (https://portal.azure.com) and log in (obviously, you will need to have sufficient permissions to perform any of these steps, so you may need to work with your Office 365 Global Administrator) and select Azure Active Directory on the left-hand side.
2. You will need to know your Azure AD Tenant ID, so to find that, click on Properties and copy the Directory ID. Close the blade.
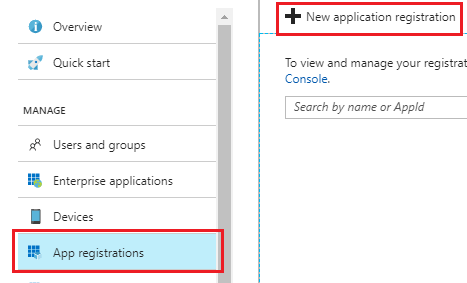
3. Click “App registrations” on the left and then “New application registration” at the top of the blade.
4. Enter the required information:
- Name: Anything you want it to be that clearly defines the purpose of the app. I called mine, “Zapier.”
- Application type: Web app / API
- Sign-on URL: this really doesn’t matter for this application, so anything that’s a valid URL. I used, https://zapier.com
5. Click on the created App and then “Required permissions” in the blade that opens.
6. Click the “+ Add” button at the top, then Select an API. In the list, select “Dynamics CRM Online” and then click the “Select” button.
7. In “Select permissions,” select “Access CRM Online as organization users.” Then click the “Select” button.
8. Click Done to add these permissions and then click the “Grant Permissions button” at the top of the “Required permissions” blade.
9. Click the “Keys” item on the left.
10. Enter a new key. This is essentially a password that Zapier will use when connecting later.
- Description: anything you want.
- Duration: choose how long you want the password to be good for.
11. Click Save at the top. At this point, the Value column on your key will be populated. Copy the value and save it somewhere as you can’t get back to this value later (although, you can create another key).
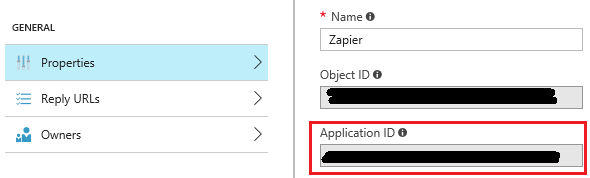
12. Click back to the Properties tab and copy the Application ID as well.
Create an Application User in Dynamics 365
The next major step is to add the application as a user in Dynamics 365 and give it the appropriate permissions. This doesn’t require an additional license.
1. In Dynamics 365, go to Settings > Security > Users.
2. Change the View to Application Users (this is important – otherwise, when you click the New button, it will tell you that you need to add users in the Office 365 portal).
3. Click the New button.
4. Change the form to Application User if necessary.
5. Enter the required values and save the User:
- User Name: anything you want
- Application ID: the value you copied in step 12 of the previous section.
- Full Name: anything you want
- Primary Email: anything you want
6. Click the Manage Roles button at the top and give the user a role with the permissions it will need based on the specifics of your Zap (e.g. Lead Create, Read, etc.). This has to be a custom security role.
Get an Authorization Token
Now that you have configured access for your application, you can finally use it in a Zap. Before making requests of the Dynamics 365 web API, you need to get an authorization token from Azure Active Directory.
1. In Zapier add a step and choose Webhooks from the Built-In Apps.
2. Choose POST.
3. Enter the required values
- URL: https://login.microsoftonline.com/[TenantID]/oauth2/token Note: replace [Tenant ID] with the value copied in step 2 of the “Create Azure AD App” section.
- Payload Type: form
- Data: add the following key: value pairs
i. grant_type: client_credentials
ii. client_id: the application ID you copied in step 12 of the “Create Azure AD App” section
iii. client_secret: the Key you generated and copied in step 11 of the “Create Azure AD App” section
iv. resource: your Dynamics 365 URL (e.g. https://yourorg.crm.dynamics.com/)
4. Complete the setup and test it. You should get back a result that, among other things, includes an “access_token” attribute.
Use the Authorization Token
Now you can connect to the Dynamics 365 web API and use all of its powerful OData query semantics as you see fit (https://msdn.microsoft.com/en-us/library/mt607990.aspx).
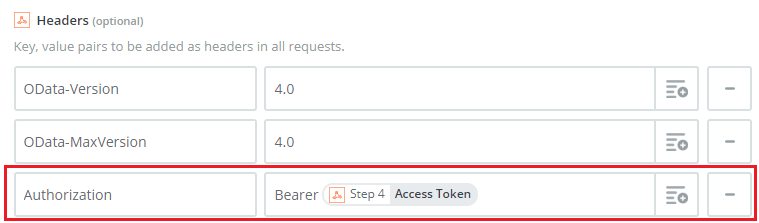
The key to authenticating is to use the access_token retrieved in the previous section. For each step connecting to Dynamics 365 for a GET or POST, in the Headers section at the bottom, make sure you enter an Authorization header with “Bearer “ and then your retrieved access token:
The key to authenticating is to use the access_token retrieved in the previous section. For each step connecting to Dynamics 365 for a GET or POST, in the Headers section at the bottom, make sure you enter an Authorization header with “Bearer “ and then your retrieved access token:
If you have any questions, please feel free to contact us.